DrumThrash Logo Icon
DrumThrash Drum Machine Software for PC

Creating Drum kits

The drum kit is the foundation for making a good sounding drum track. DrumThrash lets you customize your own drum kits. After importing audio and creating instruments we'll learn how to control kit properties, change instruments, and set the MIDI and Choke map. Finally, we'll demo the snare drum using the Sample blender.

You can use the multi-sampled drum kit that's included with DrumThrash or you can use your own samples.

Why Multi-sampled drums?

Human drummers do not hit the drum the same way each time. Multi-sampled
means that one instrument has been recorded or "sampled" several times. If you take a look at a drum kit that comes with DrumThrash you will see that there are sixteen samples for just one snare drum. When listening closely each sample you may notice they sound slighty differerent in pitch and velocity. This is because the drummer hit the snare at a different spot on the drum for each time it was recorded. Ultimately multi-sampled are used to randomize drum hits to make tracks sound more realistic.
Importing audio
Create an instrument group
Kit views
Kit properties
Changing instruments
MIDI Map
Choke Map
Sample blender
Where to explore next?

Importing audio

 
In order to load samples into DrumThrash you first need to browse for a folder containing WAV, MP3 or OGG files.

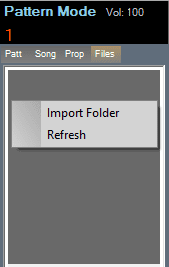
Select Import Folder from the File menu.

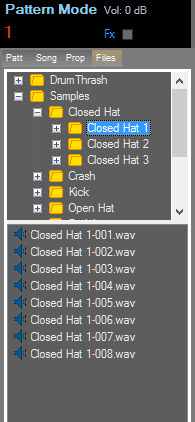
Click the Files
tab on the Function panel to display imported folders.
Importing audio
By default there are two folders that have already been added. The first is a DrumThrash folder which is a recommended folder to save and export your files. The second is a Samples folder which contains the included drum samples. The Samples folder is located in the program's installation directory.

You can also import a folder by right-clicking the top portion of the Files panel.
Playback mode
The newly imported folder will be displayed in the top panel and the contents will be displayed in the lower panel.

Click on an audio sample to hear it play.

To remove a folder or refresh the panel contents right-click on a folder then select the option from the menu.

Audio can also be imported using the Controller panel files view.

After you have imported an audio folder you can start building drum kits.

Create an instrument group

 
Creating instrument groups allows you to randomize hits when adding them to the Event panel.

To create a new instrument group drag one or more audio samples to a
blank area on the Kit panel.
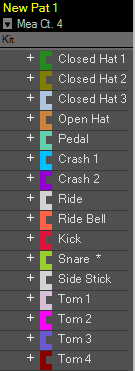
DrumThrash kit panel
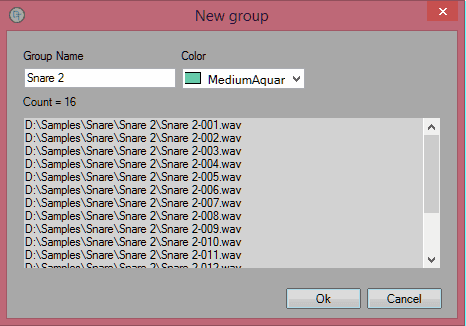
The New group dialog will be displayed.
New instrument group
Type a name for the group.

Pick a color from the list.

Group name and properties can be changed later by selecting the Kit properties tab.

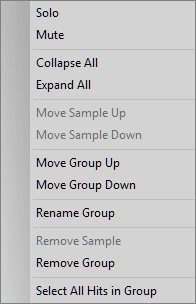
Right-clicking on a sample or group will give you more options.

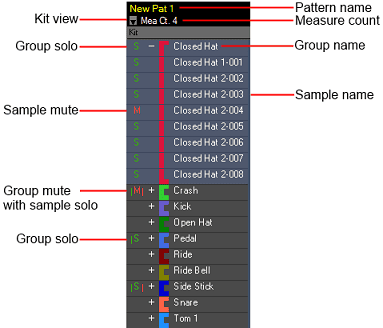
From top to bottom, Kit options are:
Kit menu

Kit views

 
There are three different kit views. Switching between views will help save screen space by hiding options that you're not using.
To change kit views click the small downward arrow at the top of the kit panel.
Kit view
From top to bottom, Kit view types are:
Kit view menu
Kit view detailed

Kit properties

 
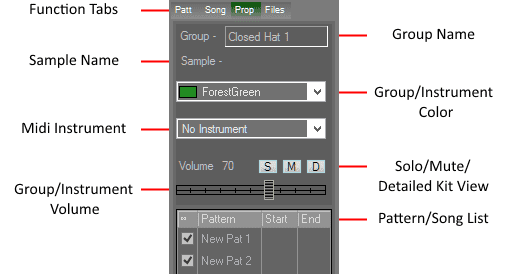
Select the Prop tab on the Function panel to display properties for the kit. Once the tab has been selected, left-click a group or sample that you want to display properties for.
Kit properties

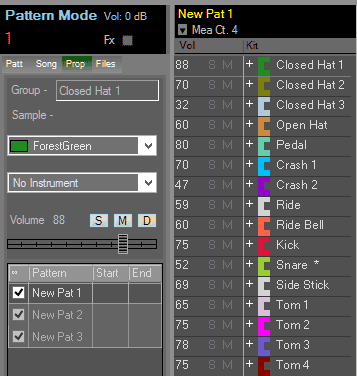
The easiest way to mix drum kit levels is to have the Detailed view selected with the kit properties tab open. You can also switch to this view using The Detailed view button under the Properties tab in the Function panel.

Kit-detailed-view
You can change volume levels without the slider. Click the volume text next to an instrument then drag your mouse up or down to change it.

Click the "S" or "M" next to an instrument to solo or mute an instrument. Instrument volume levels max at 110. Anything past 100 is applying gain.

Changing Instruments

 
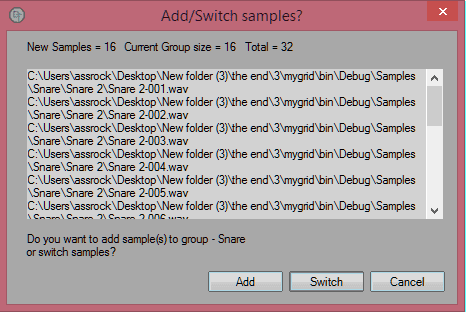
To switch out audio samples in an instrument group, drag the samples using the Function panel or Controller panel onto an existing group.
Add switch samples
You will be given the option of adding the samples to the existing group or opening the Group switch dialog.
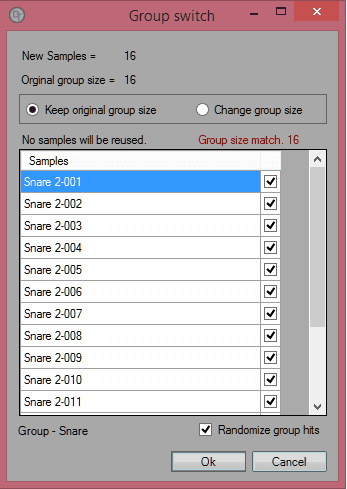
Group switch dialog

Randomize group hits: Selecting this option Randomizes all hits in the group for all patterns in the project.


Keep original group size: If there are enough samples to replace the entire group the correct amount of samples will be selected, and you can hit Ok. If there are not enough samples to replace all of the existing ones then the selected samples will be reused to fill the group.

Change group size: When changing a group size samples will not be reused. If the size is going to be smaller the Consolidate group hits dialog will be shown.
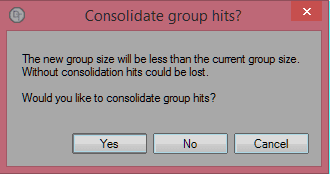
Consolidate dialog
Consolidating group hits will keep all hits from samples that are to be removed. Only hits from samples that are to be removed will be randomized within the smaller group size "unless the Randomize group hits box has been checked".

When changing out samples it applies to all patterns in the current project.

MIDI Map

 
DrumThrash uses standard MIDI maps to import MIDI and export MIDI files. The maps are not required but will help speed up the process when importing and exporting Midi files. The MIDI map is also used when you audition MIDI and DrumThrash pattern files.
Click
the Kit View button at the top of the Kit panel then select MIDI Map.
Midi Map menu
The MIDIi map will be displayed next to the drum kit.
Kit view midi map
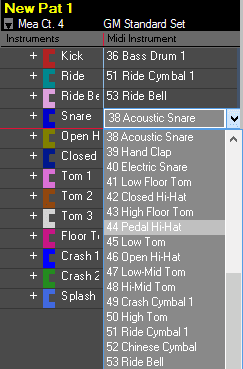
To assign a MIDI instrument to a group double-click the MIDI instrument column.

Select the MIDI instrument that you want to assign.

The Kit Properties tab can also be used to set MIDI map assignments.

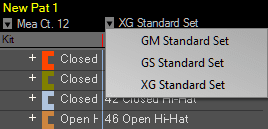
DrumThrash provides a few standard Midi maps. The map that you use isn't really important. You can use whichever one you feel comfortable with.

To change MIDI maps click the Current MIDI Map button at the top of the
Kit panel.
Current MIDI map

Choose from:


Choke Map

 
The Choke Map allows you to assign a group to stop another from playing/ringing out.

Choking is primarily used for hi-hats but can be used for any instrument. For Cymbal catching the
Controller panel Length view might be a more appropriate option.

Click the Kit View button at the top of
the Kit panel then select Choke Map.
Choke map menu
The choke map will be displayed next to the drum kit.
Choke map view
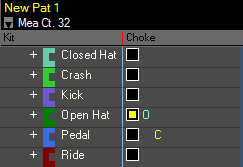
To assign the choke first select the group you want to assign as "closed" then click the checkbox next to the group you want to assign as "open".

Closed groups are indicated with a yellow "C".
Open groups are indicated with a green "O".

To see the playback duration of hits use the Visual Hit Length on the View toolbar.
Visual hit length button
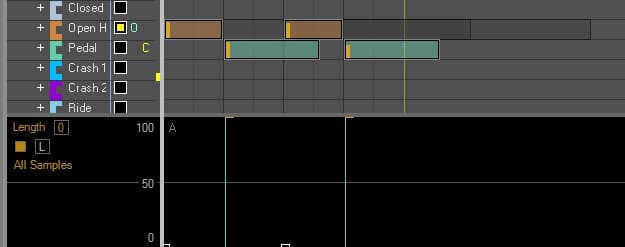
Choke Map ex1
Choke Map ex1
In the image above the closed hats are choking the open hats preventing them from ringing out. The "open" groups will be choked automatically upon the "closed" group's initial playback.

You can adjust the time before cut-off
using the Controller panel Length view or use the Length tool on the Tools toolbar.
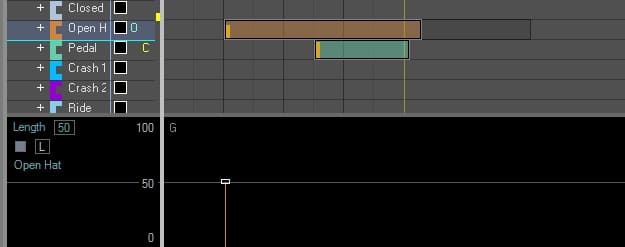
Choke Map ex2
Choke Map ex2
In the image above the Open Hat has been relieved 50% from its initial choke point

Sample Blender

 
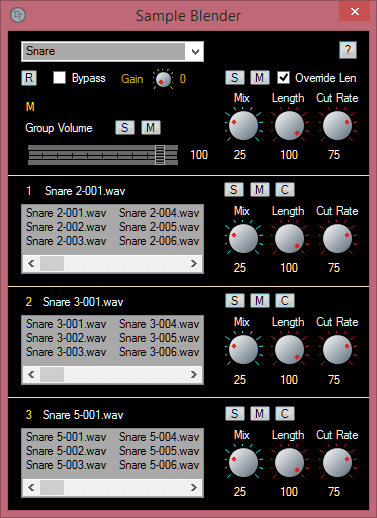
The Sample Blender was initially introduced as a way to tailor the sound of the snare drum, although it can be used on other instruments as well. It allows you to layer up to four samples together at the same time.
Drumthrash sample blender
If we used one audio sample and played the same sample in rapid succession over and over it would not sound very pleasing. It produces a stiff robot sound sometimes referred to as the "machine gun effect".

Here is an example of a snare roll that uses only one audio sample.
Now let's try randomizing group hits using multi-sampled drums.
That sounds a little better.

Finally, let's use multi-sampled drums and assign the Sample blender to the snare.
Hopefully most would agree that the last example feels much more natural.

Use the button on the Tools Toolbar to open the Sample blender
Sample Blender  button
To set up the Sample Blender, assign the blender to a group using the drop-down. An asterisk * will be appended to the end of the assigned group or instrument name.

You can add samples to the blender by dragging samples under
the Files tab on the Function panel or Controller panel files view to one of the blender panels.

During playback a random sample from the blender list will be blended with the assigned instrument or group. The Sample Blender can only be assigned to one group or single sample in your drum kit at a time.


Remember when using the Sample Blender more is not always better. Sometimes, two samples can sound better than three or four depending on the desired effect.

Some kit tips

 
Use a high-quality recorded drum kit. Your drum tracks will sound much better if they sound like real drums to begin with.

When using your own drum kits it's usually best to use louder samples recorded at relatively the same volume level and let DrumThrash control the levels.

If the pitch difference between samples is too drastic things can start to sound unrealistic.
Now that you have created your drum kit it's time to start programming a drum beat.
Copyright © DrumThrash 2024, All rights reserved
DrumThrash Logo Icon
Facebook
Twitter
Youtube