DrumThrash Logo Icon
DrumThrash Drum Machine Software for PC

Programming a drum beat in DrumThrash

This section will show you how to program a drum beat in DrumThrash. We'll create a new project, discuss playback modes, select a grid division, explore time signatures, and arrange a song list. At the end are some drum programming tips to help improve your tracks and make your drummer sound like a pro.
Creating a new project
Choosing a playback mode
Selecting a time signature
Edit a time signature
Creating a new pattern
Selecting a grid division
Set a custom grid division
Programming a simple drum beat
Odd time signatures
Arranging a song
Drum programming tips
Take your tracks to the next level

Creating a new project

 
Click the New project button on the File toolbar.
New project button
You can also use the File menu or Quick Start dialog to create a new project.
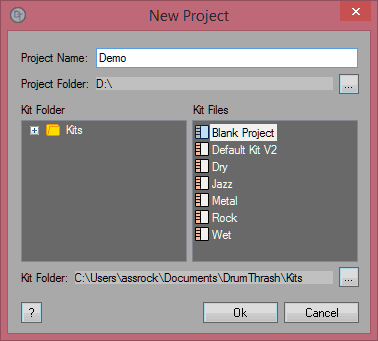
New project dialog
Type a name for the new project.

The Project Folder is the working directory for your project.

You can browse for a folder containing DrumThrash drum kit files.

The default kit file that's included with DrumThrash is located in the users Documents folder
DrumThrash\kits\Default Kit V2.dtkit".

Choose from one of the available kits.

Selecting Blank Project will create a new project without a kit.

The drum samples that are provided are in the program's installation directory.

Instruments in your kit can always be changed out at a later
time. See Creating drum kits.

Click the Ok button to create your new project.

Choosing a playback mode

 
DrumThrash has two playback modes: "Pattern" and "Song" mode.

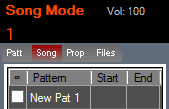
Clicking the "Patt" and "Song" tabs on the Function panel will switch between modes.

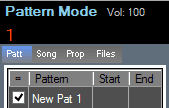
Pattern mode is the default playback mode. It is used for playing one pattern at a time only. You can consider this list to be the main list as it contains all patterns in the current project. Since you have the ability to add unlimited measures you could program one pattern for an entire album
Pattern mode
Select the checkbox to loop the pattern continuously.

Double-click on a pattern to rename it. Note that if the pattern is in the song list it will also be updated.

Double-clicking the start and end columns will allow you to set loop points. Setting loop points can also be done using the Time ruler or Transport panel.

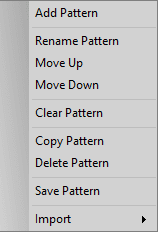
Right-click on the pattern list to access options.

From top to bottom, Pattern Mode options are:
Pattern mode menu
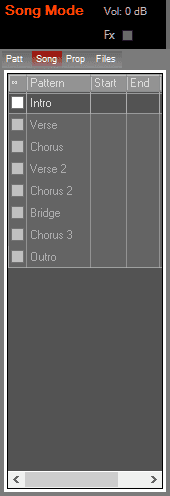
Song mode allows you to add patterns to a list for sequential playback.

Here's a scenario.
We could create separate patterns then name them as follows: "verse", "intro", "chorus" and so on. We could then add them to the song list and rearrange them as "intro", "verse", and "chorus". They would be played from the top of the list to the bottom without interruption. Taking it one step further we could make a copy of the verse, add some more cymbal crashes, make a different drum fill and use it as verse two.
Song mode
To learn more about this mode see Arranging a song.

Which playback mode should I use?

When deciding on a playback mode, there is no right or wrong way to create drum tracks. Some people may choose to program their drums into one long liner track using Pattern mode while others may choose to break a track into multiple segments using Song mode. If you are unsure then you should use Pattern mode as you could always split the track into sections later.

Selecting a time signature

 
DrumThrash supports different time signatures even within the same pattern.

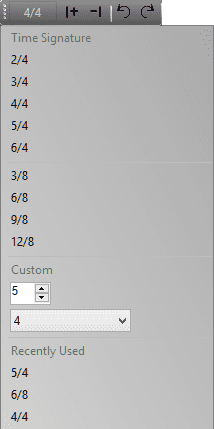
Click the time
signature on the Edit toolbar.
Time signature
You can set a custom time signature at the bottom of the drop-down menu. The next time a measure to a pattern the time signature on the toolbar will be used.

Click the plus and
minus on the Edit toolbar to add or delete measures.
Add delete measure button

Edit a time signature

 
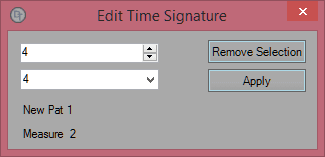
To edit an existing time signature right-click on a measure that you want to change and select the option from the dropdown the menu.
Edit time signature
Remove Selection will remove focus from the selected measure.

Click the apply button to accept changes.

Creating a new pattern

 
Once you have chosen a playback mode right-click the pattern or song list.

Select Add Pattern from the drop-down menu.
Pattern mode menu

Selecting a grid division

 
The grid resolution can be set from one whole note to a 256th note. When Snap to grid is enabled hits and tempo markers will snap to the set resolution.

Left-click the grid division
box located on the Quantize toolbar.
Grid division
The menu contains straight, triplet and dotted notes which are commonly used divisions. The menu also allows you to access user Quantize User Presets and recently used divisions.

Set a custom grid division

 
Right-click the Current division box located on the Quantize toolbar. A small drop-down menu will open where you can set a custom division.
Custom division

Programming a simple drum beat


In this example we'll program a simple eighth note pattern. This one the simplest and most common beats known to drummers. Before creating a beat you first need to have a drum kit loaded. See Creating drum kits. You will also need to have a pattern added to your project. See Creating a new pattern.


Select a time signature from the Edit toolbar.

Edit toolbar time signature
Click the plus next to the time signature to add a measure.
Add delete measure
Select a grid division from the Quantize toolbar.
Current division
Ensure that the Hit tool button is selected on the Tools toolbar. "[H] key".
Hit tool button
When Snap to grid is enabled, clicked hits will always align to the nearest division on the left. When it's disabled the hit will be placed where you clicked.
Snap to grid button
If Variable Hit Velocity is enabled on the Tools toolbar a random velocity will be chosen for each newly added hit. Leaving the max velocity somewhere around 80 to 90 will leave you some extra headroom if needed.
Variable hit velocity button
Start playback from the Action toolbar if you want to live edit. You also can use the spacebar to start and stop playback.
Play stop button
Left-click the Event panel to add drum hits.
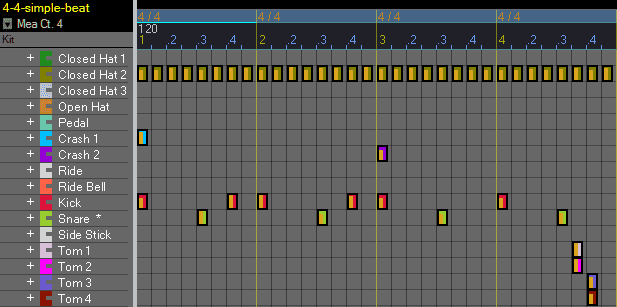
eighth note pattern
Simple eighth note pattern.120 BPM
In the example above the hi-hats were created using eight notes, while the kick and snare are accenting the quarter notes.


now we can add a kick drum.

A simple 4/4 time signature contains 4 quarter notes. The top number is how many beats are in the measure. The bottom number tells you what type of note the beat gets. If we divide a quarter note by 2 we get an eight note. This is also known as a Tuplet. To learn more
see Creating Tuplets.

Right-click
the Event panel to access more options.

From top to bottom, Event panel options are:
Event panel menu

Hit randomization is important to making a beat sound authentic. Clicking on the parent row of a group will pick a random sample from within the group. Expand a group to choose a specific sample.


Use the Eraser tool from the Tools toolbar to quickly delete hits

Eraser tool button

Right-clicking on a hit while holding the Ctrl key will delete hits acting as the Eraser tool.


The Selection tool on the Tools toolbar can be used to cut, copy, and delete multiple hits.

Selection tool button

Odd time signatures

 
When a beat cannot be divided evenly it is known as irregular or odd time. An odd meter can feel disjointed and yet satisfying. When counting an odd meter it's often broken in smaller sections.

For fun here is a beat programmed in multiple odd time signatures. The track was programmed in 3/4, 5/4, 3/8, 7/8, and finally 9/8 time.
Odd time signatures.120 BPM
Adding five notes evenly to a 4/4 time signature does not equate to 5/4 time as the measure could not contain the five quarter notes. Instead this would be a quintuplet within a 4/4 time. If creating a 5/4 beat you would first need to select the appropriate time signature.

Odd time isn't so uncommon and is used more than one would think. It would be hard to find a music genre which hasn't explored odd time signatures. That being said, there are still lots of areas to explore.

Arranging a song

 
The song list is used for sequential playback of patterns from top to bottom. They can be arranged and reused in any order. All patterns in the song list also exist in the pattern list.
 
Click the
Song tab in the Function panel to enable Song Mode
Song mode list
Selecting the checkbox will cause the pattern loop continuously.

Double-click on a pattern to rename it. Note: The pattern list will also be updated.

Double-click the start and end boxes to type in loop points. As with the pattern
mode you can set loop points faster using the Time ruler or Transport panel.

The repeat column will allow you to play a pattern n times before continuing down the song list

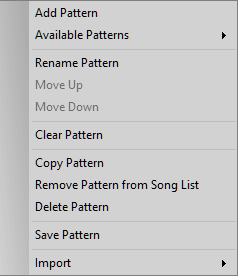
Right-click anywhere on the song list to access options.

From top to bottom, Song mode options are:
Song mode menu


The Loop Song button on the Action Toolbar will loop the entire song list.

Loop song button

Drum programming tips


Learn the keyboard shortcuts:

Learning the keyboard shortcuts can save you a lot of time. When using the Hit tool hold down one of the following keyboard keys while adding a hit to automatically fill in measures.


Autofill hit keys:

[1] Key: "All" divisions in a measure.

[2] Key: "Even" divisions in a measure.

[3] Key: "Odd" divisions in a measure.

[4] Key: "Tuplets".


Use the new Draw tool to save track building time. See Learning the basic tools.


Cymbal catching : A cymbal catch is when a drummer grabs the cymbal with their hand after striking it. This can be accomplished using the Length tool or the Length view. Sometimes a drummer will play the kick drum at the same time as hitting the cymbal. When shortening the length of an instrument it may lower the overall volume level. You may need to apply more velocity to the cymbal.


Cymbal roll: A cymbal roll is that nice swoosh sound you will often hear at the beginning of a song. Randomization is really important here.The more random each hit is from the previous is going to sound better. Often a kick drum will be added at the end.


You can produce some interesting results for a cymbal roll using the following methods.


Hi-hats: The hi-hat is what carries the beat forward. This is usally where drum programming starts. Setting the Choke map. allows you to automatically close an open hi-hat. You can use the Length view to adjust the playback length of hi-hats.


Dynamics:

Without random fluctuations in velocity levels a beat will sound bland and robotic. The Variable hit velocity option gives you a good start by adding some variation to your tracks. When enabled hit velocities will automatically be randomized when they are added. Think about how a drummer accents hits. A drummer's left side might be stronger than their right side. For a double bass beat the drummer might have a heavy right foot. This is actually easy to accomplish using the Velocity view , switching to Groups, then using the Alt/Non divisions.


Hit randomization:This is important to making a beat sound authentic. Expand a group in your drum kit and make sure that hits are adequately randomized. Use the Selection tool to randomize selected hits.


Don't overdo it : It's easy to just keep adding more hits. Remember that most drummers can only hit up to four instruments at one time. Adding too many hits at the same time could make your beat start to sound unnatural. If you notice a loud offending sound in the middle of your beat you may have duplicate hits on the same instrument.You can expand a group to find and remove the duplicate hit.


Leave Headroom: There's nothing worse than having your volume set to eleven and nowhere else to go. When using the Random hit velocity option leave the max value below 90. Watch the Master mixer output for any clipping.


Take the shortcut: Use premade drum loops. Using MIDI groove files and DrumThrash can speed up the entire process. Use the Files view to Audition MIDI grooves and build tracks. For those who want to jam along with drum tracks from their favorite band there are many talented people that have already put in the hard work to create entire songs for you.


Reuse patterns: Program your own drum loops and save them as a pattern or MIDI file. Reuse simple drum tracks and add different fills to change things up. Humanize or rerandomize patterns differently. You can drag patterns and Midi files directly to the grid.


Seperate your tracks: You can export instruments to separate audio tracks then import them into a DAW (Digital Audio Workstation).This will give more control over the drum kit allowing you to adjust volume, panning, and apply effects to individual drums during the recording and mixing process.


Use effects: Add reverb to a track to instantly change the space. To create a tight feel try adding little compression. If you're going to be recording other instruments guitar, bass, piano, ect... adding too many effects may not leave enough room for the other insuments. Overdoing effects could ruin your drum tracks in the end.


Take your tracks to the next level

 
The demos patterns above were just a simple example, your tracks can definitely be taken much further. Now that you have programmed a drum beat be sure to check out How to quantize and humanize drums in DrumThrash. You can also try customizing the sound of your snare drum using the Sample blender.
Copyright © DrumThrash 2024, All rights reserved
Facebook
Twitter
Youtube
DrumThrash Logo Icon